| Data Panel |
To show the data panel for a calculation attribute or property,
click on the item's  button.
 |
| Scene Viewer |
To enable the display of attribute or property data in the scene
viewer, click on the corresponding scene viewer  button.
 |
|
To view the data panel for a calculation property, click on the property's
button. The property data are displayed in the current display mode (either
a graphic plot or a table). If the calculation is still running, the property
values will be updated as results become available.
To switch between a table and a plot:
- Position the mouse cursor over the property data panel, and click the right
mouse button, or click the Options button, if available (for example, Geometry
Trace and Normal Modes have the Options button).
This opens a pop-up menu for choosing the display mode. The menu may also
contain other display options. Examples:
| Plot Pop-Up Menu |
|
Table Pop-Up Menu |
 |
 |
 |
- Then ...
- To display a table, mark the Table View option.
OR
- To display a plot, unmark the Table View option.
Both versions of the menu include a Print option. The table menu includes
an Export option for saving table files in ASCII text format or in SYLK
spreadsheet format.
If a property plot contains a large number of data points, it may be helpful
to zoom in on a subset of the data or change the type of graph scale.
Use the Details: ChemSys Display Options window to adjust the appearance
of atoms and bonds. The visible effect of the window controls depends on
the general display style already in effect (Ball & Stick, Stick, Ball
& Wireframe, Stick, Wireframe, or CPK).
-
From the Builder's Display menu or the Calculation Viewer's
Chemical System menu, choose Render Quality and then Customize.
The resulting options window displays the current settings and controls.
All controls in the window are either exclusive options or range sliders.
Most sliders are marked from 1 to 100% with corresponding dynamic readouts
from .01 to 1.0 .
-
To adjust a display attribute, mark the option box or drag the range slider
using the  left mouse button.
| Wire Options (chemical system
appearance for Wireframe styles) |
| Line Width |
Width of the lines used for wireframe from about 1 to 10 pixels (.01
to .10). |
| Cylinder Options (bond appearance
for Stick styles) |
| Cap Style |
Appearance of the atom ends of the bonds (Caps appear only in Stick
style.) |
| Render Quality |
The stick quality modifies the stick cross section from nearly triangular
(0.1) to circular (1.0). |
| Radius |
Radius of sticks |
| Sphere Options (atom appearance
for Ball and CPK styles) |
| Hemi Spheres or Full Spheres |
Full Spheres is the preferred option for most workstations. The Hemi
Spheres option may increase display speed, but the display can be uneven. |
| Render Quality |
The sphere quality modifies the rendering from an 8-faced cube (.01)
to an n-faced polyhedron approximating a sphere (1.0) The default sphere
quality is set at about 50% (0.5). Higher values will increase the graphic
quality and rendering time for atom surfaces. |
| Ball/Stick Scale |
Relative size of the spheres from near zero (.01) to normal (1.0) |
| Note: You can also hide selected atoms or modify their depiction
in the Builder's work area by using the Style (Selected) option on
the Builder's Display menu. |
Use the Edit: Select Within Radius window to select all atoms or residues
within a defined radius of currently selected atom(s).
Radius selection can be based on a single atom or a set (multiple atoms) of
atoms. Any non-highlighted (unselected) atom that is within the specified radius
of any of the highlighted atoms will be included in the radius selection results.
The Select Within Radius option defines the distance, from any of the highlighted
atoms, to use for the radius select search.
If Select Complete Residues is indicated, then all atoms of a residue will
be included in the radius selection results if one or more of its atoms are
within the specified radius.
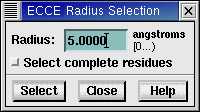
-
Select an atom or multiple atoms in the molecule.
-
From the Builder's Edit menu or the Calculation Viewer's
Edit menu, choose Select Within Radius.
The resulting options window displays the current settings and controls.
-
Enter a radius in angstroms.
-
To select complete residues, click the Select complete residues
checkbox.
-
Click the Select button to select all the atoms within
the specified distance of any currently selected atoms. If the "Select
complete residues" toggle is set, then all atoms in any residue that
was within the specified distance will also be selected. The centers of
atoms must be within the radius to be selected.
| Selection Options |
| Radius |
Select all atoms that are within the specified distance (radius) of
any currently selected atom. |
| Select complete residues |
Selects a volume encompassed by the radius you set, and will include
the complete residue beyond the specified radius. All atoms in any residue
that has at least one atom within the specified distance will be selected. |
| Note: You can also hide selected atoms or modify their depiction
in the Builder's work area by using the Style (Selected) option on
the Builder's Display menu. |
| Note: The following viewer operations really manipulate only
your viewpoint, NOT the spatial location of objects. Thus
their space coordinates remain constant in the Chemical System data panel. |
To manipulate objects along fixed axes, use the
"thumbwheel" controls.
To manipulate objects directly with the mouse:
- Click on the Manipulate button
 .
.
 |
The cursor switches to the Manipulate cursor (hand) in the work area. |
-
| To rotate the chemical system in arbitrary directions
around a center point: |
| Hold down the left mouse button and drag the cursor in any direction
within the scene viewer. |
|
|
| To move (translate) the system in the (x,y) plane
of the scene viewer: |
Hold down the  middle mouse button and drag the system within
the scene viewer. middle mouse button and drag the system within
the scene viewer.
 The cursor switches
to the Translate cursor (hand with object) in the scene viewer. The cursor switches
to the Translate cursor (hand with object) in the scene viewer. |
|
|
|
| To dolly/zoom in the scene viewer: |
Hold down  left + middle mouse buttons together
(or Ctrl + ) and move the cursor up or down in the scene viewer. left + middle mouse buttons together
(or Ctrl + ) and move the cursor up or down in the scene viewer.
 The cursor switches
to the Dolly cursor (pointing hand) in the scene viewer. The cursor switches
to the Dolly cursor (pointing hand) in the scene viewer. |
|
To display 3D Gaussian Cube Formatted data files containing grid-type data
for a calculation:
-
|
|
Click on the data panel and viewer buttons for Grids. |
-
 |
Click on the Import button. |
- From the Import window, select a *.cube file from the desired directory
and click Import. The 3D cube file will display, along with image data for
the 3D file.
- To visualise each grid, click on the grid name in the list.
-
 |
To remove a particular visualization from the list, select the grid
name and click the Unload button. |
-
 |
To create a new visualization, enter the names of grids in the Calculate
Grid fields and click the Go button. The new visualization will
display and its name will be added to the list. |
To display isosurfaces for a selected MO:
-
|
|
Click on the data panel and viewer buttons for MOs. |
- Click on one occupied orbital (MO row) in the MO table.
-
 |
From the menu button, choose MO. |
- Optional:
 |
a. Mark the Show Coeff option to view a table of
coefficients. |
 |
b. At the ABS > field enter
a cutoff value. (Coefficients below this value are ignored in computing
isosurfaces.) The cutoff value will apply to all calculations. |
-
 |
Click on the Compute button to compute the image
data for that orbital. |
- Drag the Iso: slider to set the value depicted as an isosurface
in the scene viewer.
To display isosurfaces for total electron density (all occupied orbitals):
-
|
|
Click on the data panel and viewer buttons for MOs. |
-
 |
From the menu button, choose Density. |
-
|
Click on the Compute button. |
 |
A pop-up window (with a Stop button) indicates the
progress of computing the display for each occupied orbital. |
- Drag the Iso: slider to set the density value depicted
as an isosurface in the scene viewer.
Use the 3D Grid Definition window to change the resolution and extent of the
3D grid that is used for calculating MO (and electron density) isosurfaces for
display. For example, when viewing a large molecule, you may want to limit the
display of surfaces to a particular group but increase the resolution (and quality)
of the surfaces.
- From the Calculation Viewer's Surface menu, choose Define
Grid.
The resulting 3D Grid Definition window usually includes default values
for the current chemical system--a reasonable resolution and an extent that
includes the entire chemical system.
- To adjust the grid resolution (number of values along each dimension XYZ),
type a new value in the X=Y=Z field.
Increasing the resolution means higher-quality surfaces but a longer time
needed to compute them.
By default, the resolution is uniform--the same along each dimension.
If you want to exaggerate a surface effect, unmark the Uniform
option. This enables the individual Res: fields so that
you can type a separate resolution value for each dimension XYZ.
- To adjust the grid extent (limits of each dimension), type new From:
and To: values for each dimension XYZ.
MO and electron density isosurface values will be computed only for nodes
that are within the specified grid volume.
- To see the results of changes to the 3D grid for either MOs or total electron
density, click on the Compute button in the MO data panel.
-
|
|
Click on the data panel and viewer buttons for Geometry Trace. |
| Tip: To use the geometry end state
of a calculation as the starting state of another, use the "drag
site" in the corner of the Geometry Trace panel. Drag
the chemical system--and its geometry from the final step of a
completed geometry optimization--to a calculation in the Calculation
Manager. |
 |
|
-
 |
 |
Click on the forward or backward buttons to show the chemical system
image at each geometry step. |
|
 |
Or click on the loop button to show the geometry trace animation continously. |
The corresponding value in the graphic plot (or table) is highlighted at each
geometry step.
- To change the speed of the animation, modify the Delay
(the interval between the frame steps of the animated sequence).
- To view XYZ coordinates for the currently displayed step, click on the
XYZ button.
-
|
|
Click on the data panel and viewer buttons for Normal Modes. |
- Select a normal mode frequency (table row).
- Mark the Animation Display option.
-
|
Click on the loop button to show the normal modes animation. |
- To change the speed of the animation, modify the Delay
(the interval between the frame steps of the animated sequence).
- To change the quality of the animation, modify the # Animations
(the number of frame steps in one animation loop).
- To scale the amplitude of the normal mode displacement, drag the
Scale slider above the viewer. The scale factor is the value
by which the normal mode displacement is multiplied. The initial value is
set to 1. To reset the slider to 1 after adjustment, you may need to click
on the slider background, or display another property and then return to normal
modes.
- To view a representation of normal mode vectors, mark the Vector
Display option. Vectors are represented by 3D arrows. (Vector Display
is selectable only when the animation is stopped.)
- To change the direction of the displacement, click on the Swap
Sign of Displacement toggle button. The normal mode displacement is either
added or subtracted from the atomic coordinates. The effect is to change the
vector direction or the initial animation direction.
- To force all animation steps in the same direction, mark the Actual Displacement
option. This allows you to produce geometries along a vibration mode displaced
by a specific number of steps.
| Tip: To capture the displaced geometry
for a new calculation, use the "drag site" in the Normal Modes
panel. Stop the normal modes animation at the desired step, and
then drag
the chemical system from the drag site to a calculation in the
Calculation Manager. This may be useful when applied to an imaginary
frequency obtained during geometry minimization. By stopping the
animation at a displaced geometry, you can start a new geometry
optimization from the distorted structure, which may actually
converge to a minimum energy structure. |
|
|
-
|
|
Click on the data panel and viewer buttons for Mulliken Charges. |
- To display the Mulliken charge associated with an atom, click on an atom
from the list. In the scene viewer, the atom will display a color corresponding
to its charge. To see all combined charges for an atom, click the
button next to the atom's number to display a drop-down list of all associated
charges.
- Click on another atom to display its corresponding Mulliken charge color.
Colors map to the strength of the charge as indicated in the color key at
the top of the data panel.
You can export chemical structure files or graphic files from the Calculation
Viewer. To export the current viewer contents:
- From the Calculation Viewer's Calculation menu choose Export.
This opens the Export dialog window.
- From the Format menu, choose the desired format.
Note that the export formats include
graphical formats  (POV-Ray, Postscript, RGB, GIF, TIFF, and JPEG) in addition
to the molecular structure formats.
(POV-Ray, Postscript, RGB, GIF, TIFF, and JPEG) in addition
to the molecular structure formats.
POV-Ray export offers a number of options to control the appearance of
the output image.
| Finish |
Bonds |
| Plastic
Soft
Metallic
Wood |
Bicolor-Proportional
Bicolor-Symmetric
Brass |
| Isosurfaces |
Preview - Display Size |
Glassy
Soft |
Picture... POV-Ray
Export |
- Optional: At the end of the Filter string, type a filter for limiting
the files that will be displayed in the Files list. Then press Enter (or click
on the Filter button)
- In the Directories list, click on the appropriate target directory.
- In the Selection box, type (or edit) the name of the export file.
- Click on the Save button.
To capture a sequence of images in the current scene viewer:
- From the Calculation menu, choose Image Capture.
This opens the Image Capture dialog window.
-
In the Directories list, enter the appropriate target directory
for storing the captured images (/tmp is the default).
- In the window's Prefix field, enter the prefix file name you want
for your captured images. The default prefix file name is img. Captured images
will be saved to sequentially numbered file names, for example, img_1.rgb,
imb_2.rgb, etc.
- From the window's Format pull-down menu, choose the desired
image format.
The image formats are ( POV-Ray, Postscript, RGB, GIF, TIFF, and JPEG).
- From the window's Size pull-down menu, choose the desired image
size format.
The size formats are (Video and Viewer).
| Tip... |
To use the equipment available in the EMSL Graphics and Visualization
Lab, select RGB files with the size option set to Video. |
| Tip... |
You can specify width and height of each frame (in pixels). This capability
can be used to create a set of small GIF files that can then be readily
converted to an animated GIF for web page content. |
- Select the capture Mode (Real-Time or Sequence).
- Click on the Active button to begin saving a sequence
of images.
As images are captured, you will see their filenames display in the Active
field. Once you have clicked the Active button, the system will continue to
save images until you click it again to stop. This means you can maximize
the viewer window and click the Close button on the Image Capture window,
capture images, then reopen the Image Capture window and click the Active
button to stop capturing. This enables you to capture full-screen images without
the Image Capture window being in the way of your view.
- Click on the Active button to stop saving images.
To print the current viewer image:
- From the Calculation menu, choose Print.
- In the resulting Print window, select a printer from the scrolling list
of available printers.
- Click on the window's Print button.
To view the calculation input file: From the Calculation menu, choose View
Input File.
To view the calculation output file:
- From the Calculation menu, choose View Output File.
The output file is then shown (if one exists) in a separate monitor window.
If the calculation is still running, the current bottom of the output file
will be displayed (equivalent to giving a "tail -f" UNIX command).
- If prompted to do so, press the Return (Enter) key to be able to view and
scroll the information.
Ecce Online Help
Revised: April 26, 2004
|
Disclaimer |
